Friday on the Farm: Completed Garden Fence from Hedge Posts

We have tried a few different solutions for keeping chickens, dogs, and escaping cows out of our garden. We finally settled on this as a solution:

Completed Garden Fence from hedge posts

My husband used his post hole digger on the tractor to dig holes deep enough for sturdy, hedge posts cut from our land. We did look at getting things from this fencing company, but then we decided that we wanted something a bit different to keep our animals out. So my husband used goat field fencing (4″x4″ wire) for the sides, and a regular cattle panel for the gate. We may even add a strand of hot wire around the top for roosting chickens that may wander into the garden.

This should do the job of keeping chickens out, keeping the dogs from digging cool spots for lounging, and the cows from destroying it all when they get out (which they tend to do if we leave the chain off the gates by mistake).

It is beautiful; my husband and 5 year old son worked so hard for 2 weekends and every night after work to get it completed. I’m proud of my boys and their diligent work!


Disclaimer: Some links on this blog are affiliate links; when you use those links you help support my family, at no additional cost to you. Thank you!

{painting oak cabinets} Wordless Wednesday

Look for my post on the important steps of chalk painting wood next week!

***you can read the details post on chalk painting oak cabinets and/or pine chairs HERE

Disclaimer: Some links on this blog are affiliate links; when you use those links you help support my family, at no additional cost to you.  Thank you!

This entry was posted in DIY.

Chalk Painting over Latex Painted chairs

**PLEASE READ: There is an important step missing in this post. This was our first project and we didn’t have these chairs very long before purchasing new ones for a larger table my husband built, so I am unsure of how they turned out long term. I chose not to prime because the paint was dark, but that was still a mistake.

Please see my post: Why You Should Prime BEFORE Chalk Painting Wood

Chalk painting our dining room chairs has been pretty easy, and very enjoyable.

Supplies I’ve been using:

I still haven’t decided which color combo I prefer on the chairs, with my table and open floor plan. Because our cabinets will all be white, and hopefully there will be white bead board on the walls and chair-rail height, I am thinking I don’t want them all painted in white with red seats. It will just be *so* much white, and Im not in the white farmhouse camp.  However, this is the prettiest combo at first glance…

I do plan to repaint the white on the one white chair I’ve done; I do NOT like how it looks distressed. I will re-wipe with Krud Kutter, cover with chalk paint, and re polycrylic. It just didn’t turn out how I thought it would distressed.

The red chairs with stained wood seats turned out with a beautiful finish; still debating if I will paint the seats white, or leave them dark wood.


My process for the chairs has been:

  • clean with wet rag and grease cutting dish soap (Dawn) to remove any food, fingerprints, dust, etc. from tiny humans and dog
  • wipe well with Krud Kutter all over, wip to dry
  • **Let sit and dry for 30 minutes** The Krud Kutter instructions say you can begin painting sooner, but I have found 30 minutes helps prevent the paint from repelling on the chair
  • wipe to remove any dust
  • begin chalk painting with chalk paint brush-YES a chalk painting brush makes a difference in application. Trust me! I wish I’d had them for the fireplace and built in hutch.
  • polycryclic with foam brushes (2-3 coats, one after the other as soon as first has dried).

The latex paint was peeling in some places, so on those areas I did a quick sanding with my sanding sponge. Not every chair had peeling; the red chair took the chalk paint just beautifully! I am so pleased with how it turned out. Once I finished the bottom, I was able to turn the chair over and begin the top. By the time the top was done, I could start on the 2nd coat of chalk paint on the bottom.

Chalk paint dries SO fast, so finishing a chair doesn’t take long. Polycrylic also dries quickly.

I am not done with the entire project; I still have 2 chairs to complete, and the white one to redo with fresh paint. I think I am opting to NOT distress any of the chairs. I like the smooth, polished, matte finish. They will probably get plenty of distressing from years of use from my 4 children, anyway. haha

I will share pictures of the final product(s) when all the chairs are done. I will probably sit on them a while (pun totally intended!) before I decide to paint the seats white, or leave them.

Have you chalk painted? Do you enjoy it?

This is by far my favorite way to do projects! I’d like to try waxing on a nicer piece soon (something that doesn’t get abused, and wiped frequently!)


Disclaimer: Some links on this blog are affiliate links; when you use those links you help support my family, at no additional cost to you.  Thank you!

DIY No Cook Play Dough

This is the easiest DIY play dough recipe I have ever made, and it is so soft! The play dough only has 3 ingredients that you are sure to have on hand.

This winter has been so frigidly cold, we’re in need other ways to meet all the kids’ sensory needs, so I am being more intentional this winter about sensory and messy play with my 4 children. Usually, all 4 are in the dirt, mud, flower beds, mixing flowers and leaves in buckets, and running barefooted.

Play dough can double as a good heavy work activity for children that need help self regulating, as well.

Easy DIY Play Dough


We like adding essential oils to our play dough for an added calming affect. After they explore with just the dough for a while, I let them have their rolling pins, dough stamps, and other tools. I also like to have them divide the dough into 10 balls, set up like a ten frame, then we do some hands on math!


Disclaimer: Some links on this blog are affiliate links; when you use those links you help support my family, at no additional cost to you.  Thank you!

Gingerbread Play Dough

I have been looking at a lot of different crafts for the kids and I to do together.  I came across a recipe for salt dough, which is a homemade play dough.  I had planned on trying it, then today my mom sent me a similar recipe, but there were two differences: 1) her recipe was for GINGERBREAD play dough and 2) it used fewer ingredients than the recipe I had.

Gingerbread Salt Dough
You will need:
  • 1c flour
  • 1/2c salt
  • cinnamon, nutmeg, all spice, etc to desired smell/color
  • 2tsp cream of tartar
  • 1c water
  • 1tsp veg oil
  • essential oils of your choosing

Just as in baking, mix all your dry ingredients together- the flour, salt, cream of tartar, and spices.  The spices are just for a great gingerbread smell and color.
In a separate bowl, mix the water and oil
Add water-oil mixture with your dry ingredients in a small/med pan.
Cook mixture over low/med heat for about 2-3 minutes, stirring frequently.  WARNING-it becomes thick quickly.
You will know it’s done when it starts to pull away from the sides and bottom of the pan.
When it’s done, knead on the counter until it is nice and smooth.
*don’t forget the cookie cutters and rolling pin!*

This is the best and easiest play dough recipe I have found.  When the holidays are over, exclude the seasonings and add regular food coloring for year-round fun!

——————
(Original post Dec 2011)
Here is Lady (15 months old) playing with play dough for the first time:

 She was really only interested in the cookie cutters at first .. and yes she arranged them in size order?
” Hrm .. maybe I will touch it a little”
She did not like the texture of the dough at the beginning.


More with the cookie cutters ..


Then I made her name out of the play dough and she liked it!  Her favorite letter from her name is “i,” so she enjoyed playing with the “ball” on the “i.”  When I spell her name out loud, it goes something like this:
Me- “l, e, x
her- “I!!  I!!! I!!! I!”
Me-E
her- “LEXIE!”

It’s a lot of fun!  So, our first go at play dough was a success.  There were a few snacking attempts, but overall she did really well!  This has made me less fearful of doing more crafts and activities with her, for sure!

Try it out with your little one!

What are some of your children’s favorite activities, crafts, etc to pass the time and learn?

DIY Fall Nature Banner Handicraft {nature craft}

This last week in one of our co-op classes we had SO much fun making a DIY fall nature banner. The timing was uncanny! A few weeks ago, we came across a PVC banner printing that we thought was just amazing. So when we found out that we were doing banners, I was extra excited! I wanted to share with you what we did, so you can do it at home as well!

This could be adapted for spring, Christmas, summer … any season or occasion really. I would say it is an appropriate activity for ages 2+; a 2-5 year old may need extra assistance with the mallet, obviously. My 5yo son was able to do most of the hammering himself, he did get tired once or twice, so I would hammer and give his arms a break.

diy fall nature banner handicraft #charlottemason #naturestudy #handicraft #homeschool

First you will need to gather supplies:

  • thin fabric such as a light, thin linen or muslin
  • leaves, buds, flowers, grasses from nature
  • rubber mallet or hammer
  • tarp or cardboard (for laying everything on before hammering)
  • 3 hole punch or knife (we use a 3 hole punch so the kids could do it, and the holes would be evenly spaced)
  • twine for stringing
  • small piece of clear tape (for taping the end of the twine so it doesn’t unravel)
  • decorative leaves/acorns/etc from craft store that you may want to add
  • hot glue gun

You can either punch your holes before or after hammering, that is up to you. We did it afterwards.

  1. gather leaves, flowers, buds, & grasses of all different colors-the brighter the better!
  2. cut fabric into neat triangles (print a triangle template the size you want). You can do this by hand if you’d like or if you’re planning to make quite a big garland, I’d recommend looking into the best fabric cutting machines for precise cuttings. It’ll be a lot quicker than cutting it free hand too.
  3. warm up your hot glue gun if adding decorations
  4. lay out your tarp or cardboard, the harder the surface the better the colors will come out of the leaves and flowers. So maybe on top of concrete or a garage floor would be good.
  5. place leaves and flowers *under* your fabric triangles
  6. use the mallet or hammer to bang away!
  7. leave the bits of leaves and petals on the fabric, once they dry they are easy to roll off
  8. using a 3 hole punch, place the triangle, top edge in, under 2 of the holes and punch on each triangle
  9. cut your twine. For 4 triangles, we cut twine 36″ long, you would need more if you do a longer banner.
  10. wrap scotch tape around one end of the twine, for weaving through the holes
  11. weave twine through the holes, then tie a knot on each end
  12. *IF* you want added decorations, hot glue them onto the banner now
  13. Hang and enjoy!

Some of the students really liked using a hammer better; it does give a lot of bang for your buck. The rubber mallet covers more area, so for smaller/younger students, the mallet made the job a bit easier/less tiring.

I want to give a shout out to our wonderful “Maker’s Space” class teacher. This is one of my favorite activities we have ever done in our homeschool! It was so enjoyable, and simple to do. I look forward to doing it at home with all my kids, another season.

Disclaimer: Some links on this blog are affiliate links; when you use those links you help support my family, at no additional cost to you. Thank you!

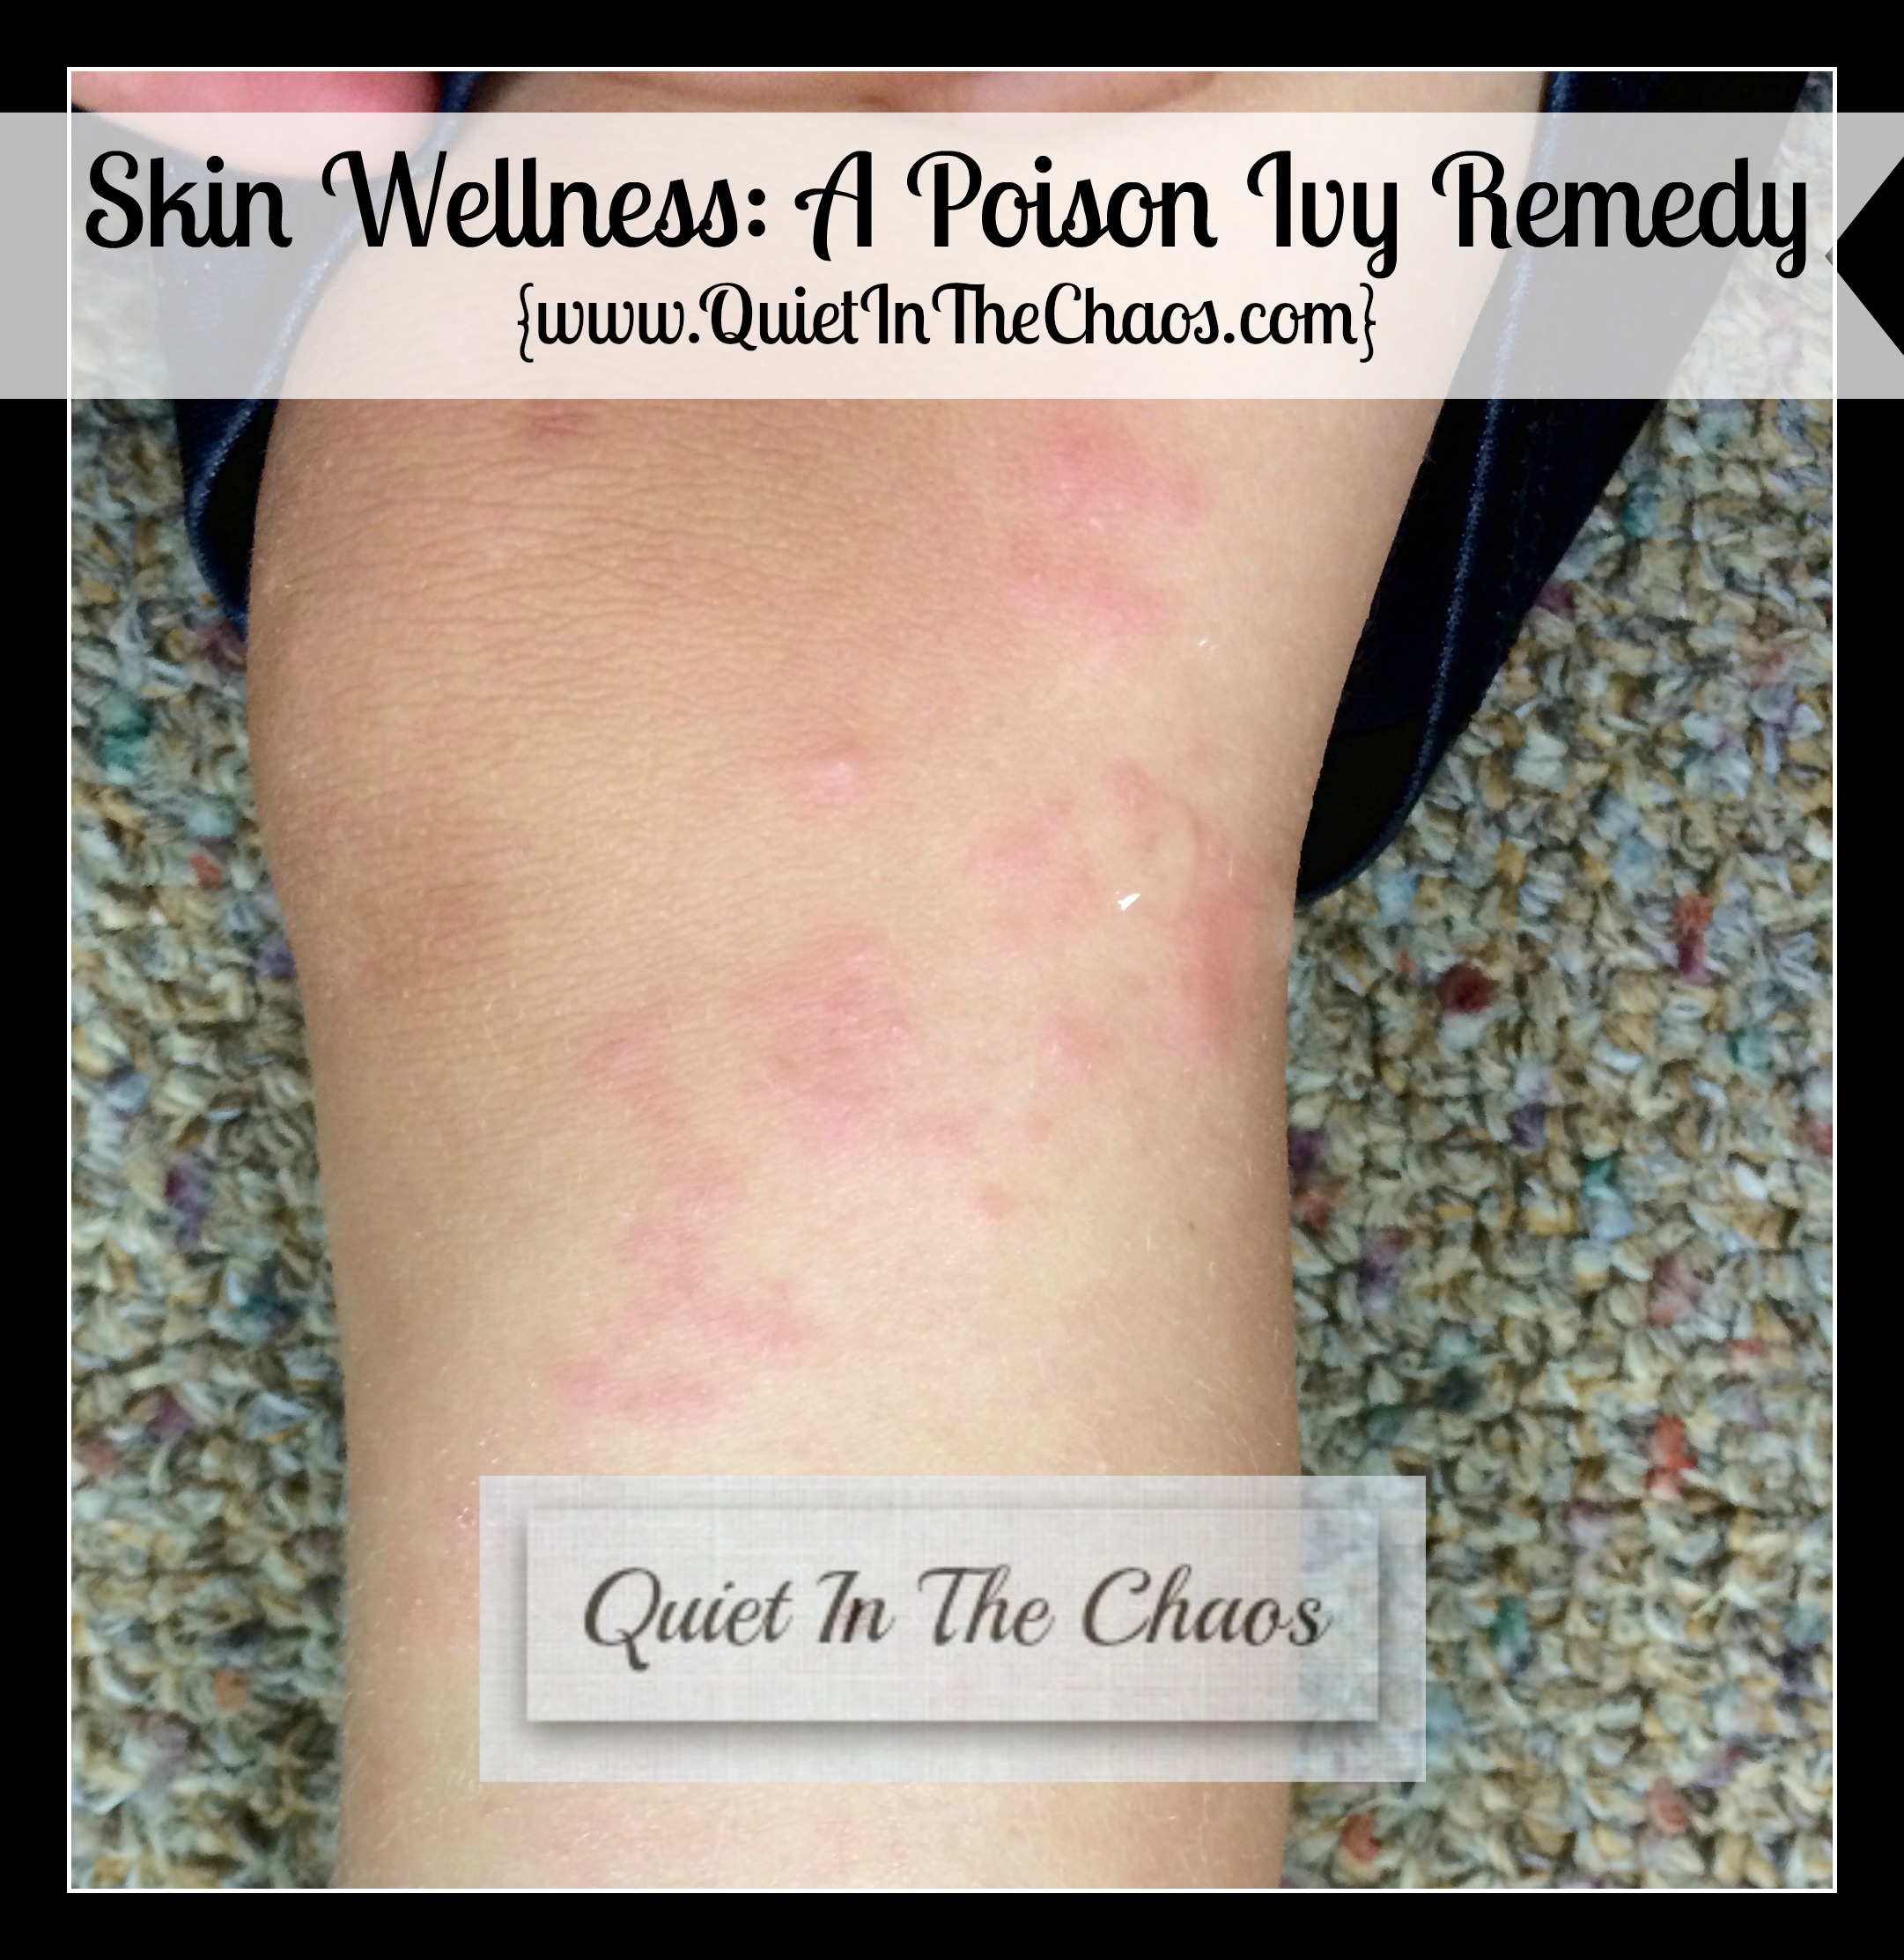
Clearing Up Poison Ivy Naturally

Skin Wellness A Poison Ivy Remedy {www.QuietInTheChaos.com}

A few weeks ago our 3 year old happened upon some poison ivy.

Having had poison ivy as a child, I knew most over the counter ointments temporarily helped ease the itching, but didn’t dry it up very quickly.

So of course I immediately went looking online for home remedies.  After reading and deciding what would work best for us, here is what I came up with, a combination of several things:

Vinegar Tonic

  • 3 tablespoons of apple cider vinegar
  • 1 tablespoon of water
  • 1 tsp salt (epsom is good)
  • a few drops of lavender essential oil and Melaleuca (or tea tree) oil to promote skin wellness

I mixed it all up in a small shot glass sized jar and applied with a cotton ball.

Iodine

I also used Iodine on the rash, usually before applying the vinegar tonic; applied with a cotton ball.

I will have you know my son’s poison ivy rash was completely dried and gone in 2 days!  The first day it was dried and smaller, and by day 2 it was clear.  I didn’t see him scratching at it, but to be sure I asked him all the time, “does it itch?” and he would say no.

So, there is our quick little home remedy for poison ivy!

Disclaimer: Some links on this blog are affiliate links; when you use those links you help support my family, at no additional cost to you.  Thank you!

Halloween Ideas: Pumpkin Box Halloween Tract {a review}

Fall time celebrations are quickly approaching! If you are anything like our family, you may keep an eye out for alternative or out-of-the-box ideas for holiday giving. In lieu of door to door trick or treating at halloween, many families enjoy harvest festivals, or small pumpkin/bon fire parties with their friends or homeschool co-ops.

This year we had the chance to try out some really fun candy alternatives for giving at halloween- Is There Anything Better Than Candy? Box-Tract by Let the Little Children Come. These little pumpkin Halloween tracts are perfect for a fun little something to drop into trick or treater bags, share with those in the community, or create in a children’s church classroom.

The small paper pumpkins are made of a nice quality card stock and sit nicely in the palm of my hand (for size reference). The inside of each section contains a simple, yet colorful message on how to know Jesus, and be saved. These are a great evangelism tool for young children to gain confidence in sharing the gospel of Jesus with friends, relatives, and those in the community.

My 7yo daughter immediately thought of  people we could share them with:

  • nursing home residents
  • trick or treaters
  • harvest festival hand outs
  • hand out at your family’s farmer’s market or craft show stand (if you have one)
  • leave out and about in the community (park picnic tables, benches down town, self check out at grocery store, etc)
  • co-op fall party
  • classroom/sunday school/co-op parties
  • drop in neighbor’s mailboxes

These were very simple to use, even for my 7 and 5 year olds; we carefully popped them out of the perforated paper, laid them pumpkin side down, and gently folded up the sides starting with the stems. Each “petal” has a small slit cut into it, and we simply slid the slit over the top of the stem pieces. Then, we continued until all the petals/sections were up, making sure that #6 was the last one. They were both able to completely assemble their pumpkins independently.

**The key (for us) to not tearing the tract while assembling was to gently squash the pumpkin down as we added sections to the stems, instead of trying to pull up and over the stems.


Things that could fit inside:

  • homemade mini-muffin-tin crayons
  • foam stickers
  • hand written notes on fun card stock
  • a handmade friendship bracelet
  • fabric book mark (maybe from a handicraft like crochet or knitting, done in homeschool?)
  • those little sticky jewels for crafts
  • small plush keychain
  • handmade leather beaded necklaces
  • small hand painted rocks
  • small foam stamps
  • stickers
  • a few tootsie rolls, peppermints, gum, or other small candies

(You know those plastic containers small vending machine toys come in? Pretty much anything that would fit in there, would fit inside these, with a little room to spare.)

We really enjoyed putting a few of these together! When we get a little closer to halloween, we will probably fill them with hand painted rocks and drop throughout the community as a little “happy” for someone’s day.

This is a fun and safe way for children to share the gospel this fall season!

Connect with Let the Little Children Come:


Read more reviews from the crew by clicking the banner below:


Disclaimer: Some links on this blog are affiliate links; when you use those links you help support my family, at no additional cost to you.  Thank you!

Paper Mache Kids Craft

For part of our summer homeschool activities, I wanted to do some hands on art/creating during the unbearably hot hours of summer.  We have enjoyed using for review Activa Products Rigid Wrap and CelluClay Quik-Sculpting Kit and the ACTÍVA Products’ Favorite Sculpture KIDS CRAFTS (a free ebook).

What It Is & How We Used It

We received the kit which contains both Rigid Wrap and CelluClay. And … if you are anything like me, you (may be?) clueless about what either of these products are really used for. So here is my breakdown:

The Rigid Wrap is plaster cloth, comes in 2 rolls that are 4″ wide each, and is used to cover just about anything you would cover in paper mache. You simply cut the cloth to strips in the size you need, place on your object/project, and add water using your fingers to smooth the surface and create!

For an object, we chose to use cardboard from a box we had on hand. Using the beautiful butterfly template from the ACTÍVA Products’ Favorite Sculpture KIDS CRAFTS ebook, I cut out the butterfly shape from the cardboard. Then we used the instructions and tips from page 10 of the ebook to create a butterfly!

Honestly y’all, this was so easy and fun! Because my oldest is 6, and I had a 2 and 4 year olds helping, our steps were:

  • I placed an empty dog food bag on the counter just in case we made a mess =)
  • I measured the strips
  • had a helper cut them
  • I wrapped them around the cardboard butterfly
  • then they each took turns applying water to their finger tips and rubbing the plaster cloth to a smooth finish.
  • we did front and back of the butterfly
  • to speed up drying time, we chose to microwave it for a minute or two (wow!  That really works!)
  • then we did the same thing, applying a second layer of plaster
  • speed dried in the microwave, and let it sit to finish drying

Because I don’t believe in “fixing” my kids creative projects, I let them rub it in as much or as little as they wanted/were able. They were SO proud of the finished project. I couldn’t believe how easy this was to do! It makes me look forward to creating more projects with them; there was virtually no mess (yay!) and was something we could all enjoy, even the 2 year old.

We used our tempera paint sticks to paint the butterfly for one reason: my back went out and I couldn’t reach the actual paints … =( haha (and my husband was gone, so he couldn’t get them for me). While the painting job is far from a professional, smooth finish, it was fun to do and easy for my oldest to do on her own.

The CelluClay project was also fun! If I am being completely honest, I am a terrible (I mean terrible) paper mache-er.  I did it one time in high school for a project in my Spanish class and failed the project miserably. I’ve never really been interested in trying it again.

But the CelluClay made it simple, and now that I understand the process a bit better (after having actually used the CelluClay) I can imagine the possibilities are endless for projects!

We mixed the CelluClay as instructed (which is great because it keeps in the fridge- score!).  Then we decided to make bowls.

Now, you probably shouldn’t do like *I* did, and just go creating a bowl from scratch.  It works! Because CelluClay is pretty awesome like that.

But for best results, you could need to have a template of some kinda to adhere the paper mache to (looking back on it, I’m thinking *duh*).  Anyway, we made bowls by forming the CelluClay like you would using a regular clay.  The kids used damp fingers to mold and smooth their own bowls- this was really fun and relaxing for them! I just handed them a ball of CelluClay, they did the rest!

After we were done, we placed them on a cooling rack and let them air dry for a few days. They hardened so nicely! I mean, they are really hard. I thought for sure they would crumble and fall a part- NOPE! They are enduring almost daily play by all the oldest three kids (6, 4, and 2 year olds).

I was really excited to use these products and very thankful for the free ebook that is full of project ideas, templates, and tips when creating paper mache projects. We printed out the pages we needed and kept them on hand during our work; my 6 year old read the directions for me as we went (which is why we just *had* to microwave the butterfly haha).

If you are looking for a fun, endless art activity for your school year this fall, this is a *great* product for kids (and adults) of just about any age; and better yet, you can grab it on Amazon!

What would you use this sculpting kit for in your homeschool?

Connect with Activa


See more projects, and read other reviews by clicking the banner below:

Click Here to Read More Reviews


Disclaimer: Some links on this blog are affiliate links; when you use those links you help support my family, at no additional cost to you.  Thank you!

error: Content is protected !!
Verified by MonsterInsights